Thursday, 22 March 2018

how to pay road tax for two wheeler in pune

http://praveentheblogger.blogspot.in/2010/02/paying-road-tax-in-pune.html

Paying Road tax in Pune

Writing this blog just to help out others who want to pay the 2 wheeler road tax in Pune. I didn't vouch for any agent so had tough time today at the RTO (Near Sangam bridge) ...the main RTO in Pune. My vehicle, Pulsar 150 cc, is Karnataka registered and I wanted to pay only the Road tax i.e my vehicle number will still be Karnataka's.
Now to start with the documents required:
1) RC Book
2) Driving License
3) Active vehicle insurance
4) Original invoice...this is used to compute the Road tax amount
5) PUC slip
6) 1 plain paper
7) Local proof...not compulsory

In case of "change of registration" u need to have NOC of vehicle previous registration. It takes some days before u r handed over the new number.

Procedure:
Get the xerox copy of all the above mentioned documents (if u haven't, there's a xerox shop in the RTO compound) and collect a FT document from a store(its free of cost) just outside the main RTO building. There will dozens of agents asking u to fill the form on ur behalf...just ignore them..the form is very simple to fill...just copy the details from ur RC book.(The form is in English).
After u have copied the details on the FT form from ur RC book, just write an application on the plain paper to the Regional officer RTO (Mr. Nikam) asking him to approve ur case to file road tax. Take the completed FT form and application to Mr. Nikam's office (enter RTO main building and take the 1st right...u'll see his office and name). He will sign on the form saying "Accept Tax". After this is done rush to the lady at the extreme corner on left..this lady will look at the invoice and compute the road tax amount on the FT form. Next, rush to another lady, Mrs Korse, this lady will have a short look at the form and just sign it and will ask u to join the queue to pay the road tax (The amount will be the one computed by the lady earlier). This is the place I got messed up big time...got in the wrong queue...the one mentioned by the Mrs Korse was wrong...I wasted around 2 hrs in the wrong line.Lines are not that big but you have agents in the line with 1o cases at a time...and some back door entries...but can't help but wait :(
Get into the line for window 23...this is the one accepting road tax for outside vehicles. After some wait and patience u'll finally get ur receipt indicating that ur vehicle has paid the Maharashtra road tax :)

The help window won't be of much help so please don't waste much time there. If you face any troublesome issue at the Office ...Mr. Nikam is the best person to contact..he sure helps :)
All the best and after this task is completed ...rip away ur bike in Pune's streets.

Friday, 23 June 2017

Ref - Out and ParamsArray Examples in Csharp

using System;
using System.Collections.Generic;
using System.Linq;
using System.Text;

namespace RefOutParamsArrayConsoleApp17
{
    class Program
    {
        static void Main(string[] args)
        {
            int start = 0;          
            Console.WriteLine("Pass by Val method below");
            Program.PassByValueMethod(start);
            Console.WriteLine(start);
            Console.WriteLine("Pass by Ref method below");
            Program.PassByRefMethod(ref start);
            Console.WriteLine(start);

            int totAdd = 10;
            int totProd = 30;
            Console.WriteLine("Pass by  Out MultiResultReturn method below");
            Program.MultiResultReturn(totAdd, totProd, out totAdd, out totProd);
            Console.WriteLine("total sum is {0} && total product is {1}",totAdd ,totProd);

            Console.WriteLine("Pass by Array(as parameter) method below");
            int[] Numberss = new int[3];
            Numberss[0] = 101;
            Numberss[1] = 102;
            Numberss[2] = 103;
            PassByArrayMethod(1, 2, 3);
            Console.WriteLine();
            Program.PassByArrayMethod(Numberss);
            Console.ReadKey();
        }
        public static void PassByValueMethod(int j)
        {
            j = 100;
        }

        public static void PassByRefMethod(ref int k)
        {
            k = 200;
        }

        public static void MultiResultReturn(int FN, int SN, out int sum, out int product)
        {
            sum = FN + SN;
            product = FN * SN;
        }

        public static void PassByArrayMethod(params int[] Numbers)
        {
            foreach (int i in Numbers)
            {
                Console.WriteLine(i);
            }
        }
    }
}
Output :


Monday, 27 March 2017

Multiple Models in a View in ASP.NET MVC 4 / MVC 5 - sample code download

https://www.codeproject.com/Articles/687061/Multiple-Models-in-a-View-in-ASP-NET-MVC-MVC

Output of all demos will be similar to the screenshot shown below:
HTML Layout of Views

MVC4 sample application creation

https://www.codeproject.com/Articles/486161/Creating-a-simple-application-using-MVC

Introduction 

In this article, we will understand what is MVC and create a simple application using Model, View and Controller.     
Model View Controller: MVC is a software architecture, which separates the logic from the user interface. This is achieved by separating the application into three parts Model, View and Controller. MVC is separation of concern. MVC is also a design pattern.
Model: Represents the logical behavior of data in the application. It represents applications business logic. Model notifies view and controller whenever there is change in state.
View: Provides the user interface of the application. A view is the one which transforms the state of the model into readable HTML. 
Controller: Accepts inputs from the user and instructs the view and model to perform the action accordingly.

Advantages of MVC:

  1. Full control over HTML rendered. No renaming of HTML IDs
  2. Provides clean separation of concerns (SoC).
  3. No ViewState (Stateless). 
  4. Enables Test Driven Development (TDD). 
  5. Easy integration with JavaScript frameworks.
  6. RESTful URLs that enables SEO. Representational state transfer URLs example User/Comment/1, which is user friendly, no URL rewriting required. 
  7. Integration on the client side becomes easy like using JavaScript, JQuery, Ajax, JSON…. 
  8. Supports multiple view engines (aspx, Razor)

Creating a simple application: 

Step-1: From file select project and select MVC 4.0 application
Step-2:Select the template and view engine (Razor, ASPX, NHaml, Spark). If want to include test project check the option “Create unit test project”
A solution with following structure is added.
Build and run the application, you can see the home page of the application. By default we have Home, About and Contact section added. 
Let’s add our own Controller, Model and View for showing User’s details. Right click on Model and add a class with the name UserModels.cs with the following structure: 
Now let’s apply validations on the fields:
  • Required: To make the field value mandatory. 
  • StringLength: To set the maximum length of the field.
  • Range: To set the minimum and maximum value.
  • DataType: To set the type supported by the field. 
Let’s add some default data to our view. For that we will create a class called user and initialize with some default value. 
Now let’s add methods for Adding, Updating and getting list of all users. 
Now let’s add view for our model for that we will select strongly-typed view and select our model class. You can see list of scaffold templates available. Since we are creating this view to add a new user we will select Create option. 
The moment we click on Add, below is the cshtml created for the view
We can see the view is having all the fields set in the model along with the validations applied on it.
Now let’s add a controller for our view. Right click on controller folder name our controller as User, select Empty MVC controller and Add.
By default our controller contains an Index method. Right click on the index method and add view for this. Index method can be used to show the list of user’s available. So we can select scaffold template type as list.
Once the view is added for Index and UserAdd, we have to define its get and post method in the controller. By default its always get, if we want a post method we have to define [httppost] before the method declaration.
HttpGet: will render the form and HttpPost will post the form data. For example we need to add a new user. First we need the form to add a user, that is get and when we will the form with values we need to post those values, so that it can be saved for further access.
Look at our controller structure, it contains two get methods, one to get the list of users (Index) and other to get the UserAdd form and with the same name it contains its post method. 
ActionResult: An action result represents a command that the framework will perform on behalf of the action method. The ActionResult class is the base class for action results. Common return Type:    
ContentResult: Can be used to return plain text or user defined content type.
public ContentResult Test() 
{
    return Content("This is my test data");
}
JsonResult: Used to return JSON, mainly used for Ajax request.
public JsonResult Test() 
{ 
    return Json ("This is my test json data");
}
PartialViewResult: The PartialViewResult class is inherited from the abstract "ViewResultBase" class and is used to render a partial view. 
public PartialViewResult Test() 
{ 
    return PartialView("Result");
}
ViewResult: It renders a specified view. 
public ViewResult Test() 
{ 
   return View("Result"); 
}
FileResult: It is used when we want to return the binary content/file as an output.
RedirectToRouteResult:  It is uesd when we want to redirect to another action method.
JavaScriptResult: If we want our action method to return a script that can be executed on the client side we can use this type.

Three new types which are supported from MVC 3

  1. HttpNotFound: This returns 404 error on client side. It can be useful in situations where the resource is not available and we want to display 404. 
  2. RedirectResult It can be a temporary or permanent return code 302 depending upon the boolean flag. Can be used to redirect to the given URL
  3. HttpStatusCodeReturn: It can be used when user want's the choice of error code to be returned from the action method. It can be any code.

Routing with MVC

MVC gives great flexibility for adding user friendly URL’s.  Routings are defined under the class RouteConfig. By default one route is already defined. 
MVC routing pattern include {controller} and {action} placeholder. For more details on routing please refer this link http://msdn.microsoft.com/en-us/library/cc668201.aspx 
This is how our index page will appear with the URL:
And the UserAdd method, here controller is User and Action is UserAdd

ViewBag, ViewData and TempData:

ViewData: 
1. ViewData is a dictionary object that is derived from ViewDataDictionary class.
2. ViewData is used to pass data from controller to corresponding view.
3. It’s life lies only during the current request.
4. If redirection occurs then it’s value becomes null.
5. It’s required typecasting for complex data type and check for null values to avoid error.
ViewBag: 
1. ViewBag is a dynamic property that takes advantage of the new dynamic features in C# 4.0.
2. Basically it is a wrapper around the ViewData and also used to pass data from controller to corresponding view.
3. It’s life also lies only during the current request.
4. If redirection occurs then it’s value becomes null.
5. It doesn’t required typecasting for complex data type.
TempData:
1. TempData is a dictionary object that is derived from TempDataDictionary class and stored in short lives session.
2. TempData is used to pass data from current request to subsequent request means incase of redirection.
3. It’s life is very short and lies only till the target view is fully loaded.
4. It’s required typecasting for complex data type and check for null values to avoid error.
5. It is used to store only one time messages like error messages, validation messages.

Points of Interest

More keen in learning MVC 4.0 new features. Lets learn to build a simple application then we can move ahead with advanced features.

Wednesday, 8 March 2017


An Introduction to Entity Framework for Absolute Beginners:

https://www.codeproject.com/articles/363040/an-introduction-to-entity-framework-for-absolute-b

Introduction

This article introduces Entity Framework to absolute beginners. The article is meant for developers who are primarily using ADO.NET to write their data access layers. Many experienced developers will find this article very basic but since the article is written from the perspective of beginners, I've tried to keep things simple.

Background

ADO.NET is a very strong framework for data access. ADO.NET has been around since many years and there are a lot of systems running over ADO.NET. Developers who are totally oblivious to the concept of ORMs will probably be asking "What is Entity Framework? What are the benefits of using it and is it an alternative to ADO.NET?"
Well, to answer the first question about what is Entity Framework, Entity Framework is an Object Relational Mapper (ORM). It basically generates business objects and entities according to the database tables and provides the mechanism for:
  1. Performing basic CRUD (Create, Read, Update, Delete) operations.
  2. Easily managing "1 to 1", "1 to many", and "many to many" relationships.
  3. Ability to have inheritance relationships between entities.
and to answer the second question, the benefits are:
  1. We can have all data access logic written in higher level languages.
  2. The conceptual model can be represented in a better way by using relationships among entities.
  3. The underlying data store can be replaced without much overhead since all data access logic is present at a higher level.
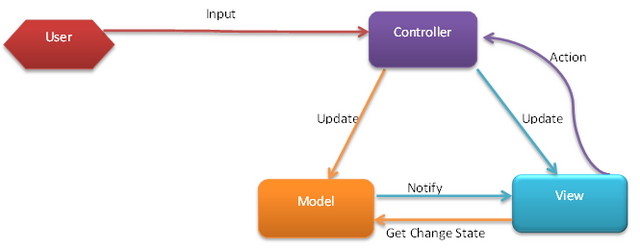
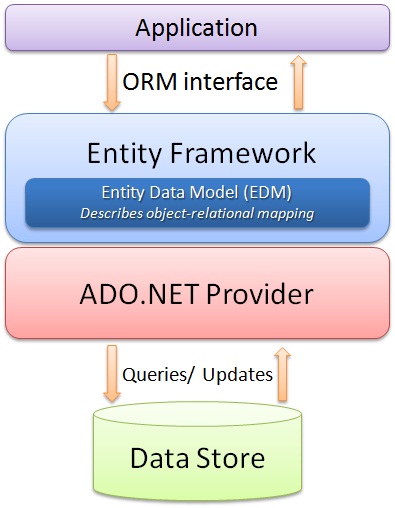
and finally, the last question that whether it is an alternative to ADO.NET, the answer would be "yes and no". Yes because the developer will not be writing ADO.NET methods and classes for performing data operations and no because this model is actually written on top of ADO.NET, meaning under this framework, we are still using ADO.NET. So let us look at the architecture of Entity Framework (diagram taken from MSDN):
Entity framework article image

Using the code

Let's try to understand the ease of use that Entity Framework provides by performing simple CRUD operations. Once we look at the code and how effortlessly and efficiently we can do these operations, the benefits of Entity Framework will become quite obvious.

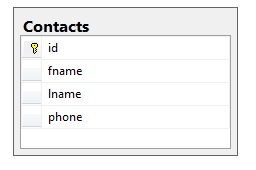
Creating the database

Let's have a simple database with one table. Let's create a simple table for Contacts and we will perform CRUD operations on this table.
Entity framework article image

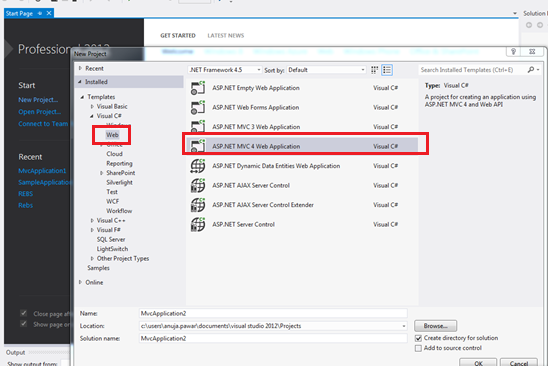
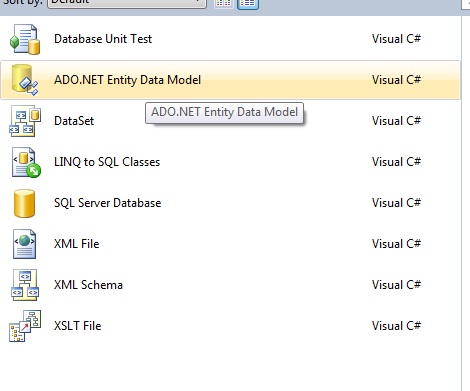
Adding the Entity Model to the Website

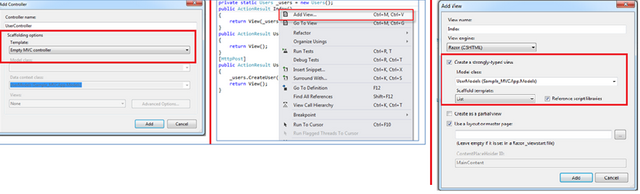
Once we have the database ready, we can add the entity model to our website. We can do this by adding an ADO.NET Entity Data Model to the website.
Entity framework article image
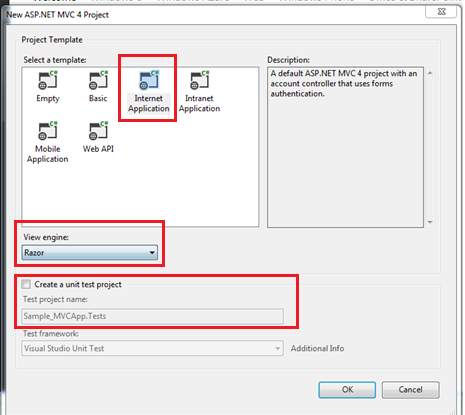
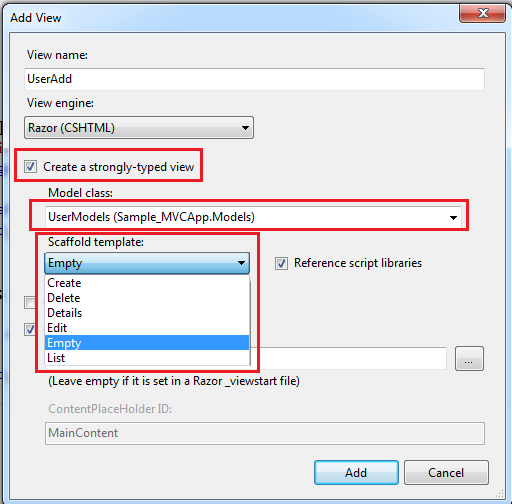
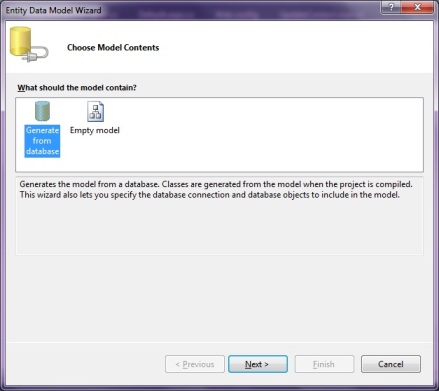
Once we select to add this data model to our website, we will have to select the approach we want to take for our Model's contents.
Entity framework article image
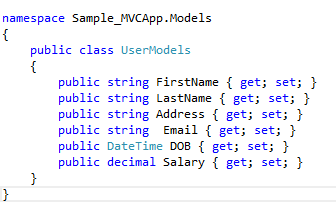
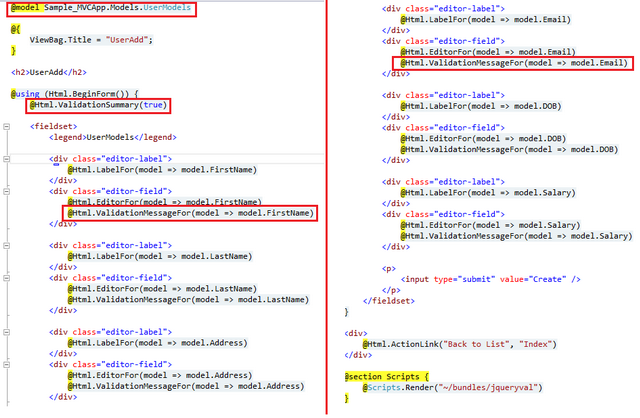
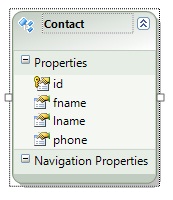
What this selection means is that we can either choose to generate the entity model from an existing database schema or we can design the entity model here and then later hook it up to the database. Since we already have the database ready, we will use the first option. Once the Model is generated, the Entity for each table is generated. The generated entity for our contact table is:
Entity framework article image
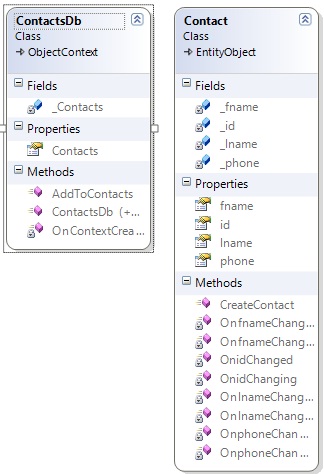
Also, the classes for performing database operations are also created. We just need to know how to use these classes to perform database operations.
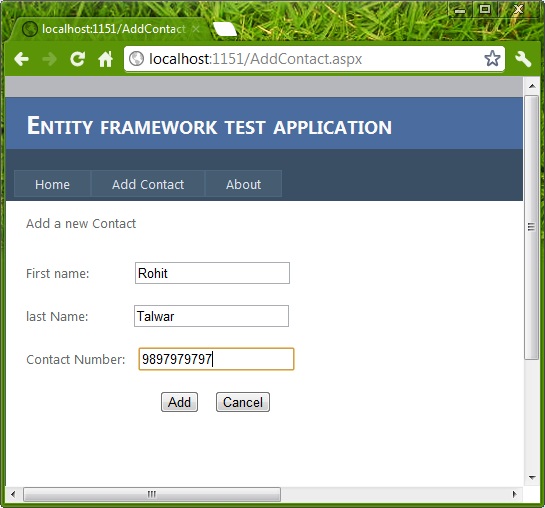
Entity framework article image

Insert operation

Let us create a simple page to perform an insert operation.
Entity framework article image
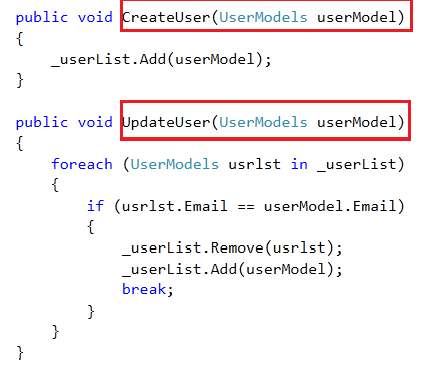
Now once the user chooses to insert the values into the database, the actual data operation can be performed by using the AddObject method of the Model class entity collection. The following code snippet show how to perform the insert.
Contact con = new Contact();
con.fname = TextBox1.Text;
con.lname = TextBox2.Text;
con.phone = TextBox3.Text;

ContactsDb db = new ContactsDb();
db.Contacts.AddObject(con);
db.SaveChanges();
This will insert the record into the table. You can notice the simplicity and efficiency of the code we wrote to perform the insertion.

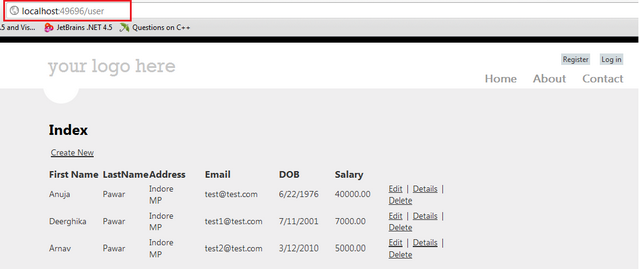
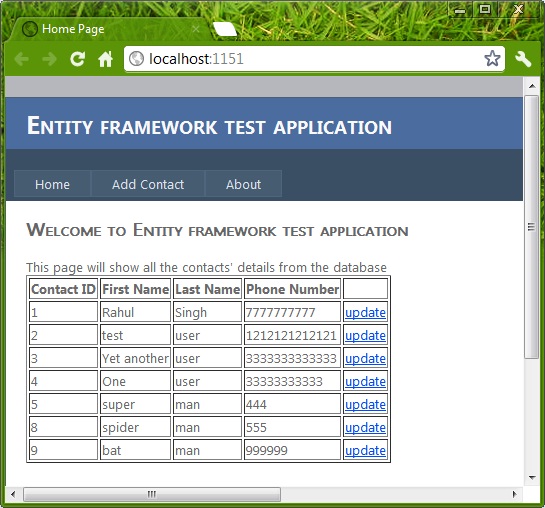
Reading all the records

There are scenarios when we want to read all records. Let's say we are making a page that will display all the contact information in a single page.
Entity framework article image
We can retrieve the collection of Entities using the Model object to achieve this. The code snippet below will show how that can be done.
ContactsDb db = new ContactsDb();
Repeater1.DataSource = db.Contacts;
Repeater1.DataBind();

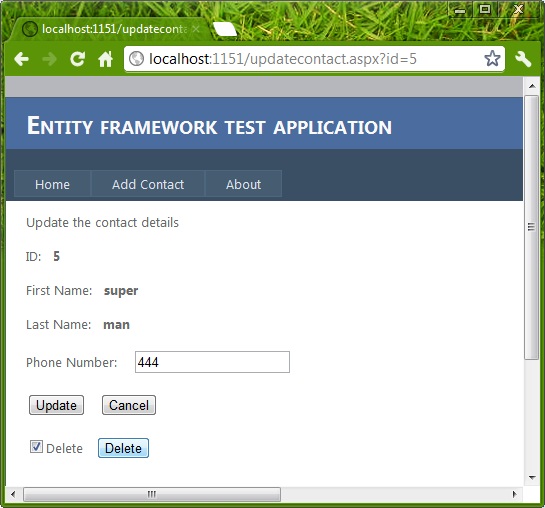
Selecting a specific record

If we want to select a specific record from the table, we can use the SingleOrDefault method on the Model's entities collection. Let's say we want the functionality of updating/deleting a record on a single page then we will first have to select the record based on the ID, then update/delete the selected record.
Entity framework article image
Selection of any particular record (Contact) based on ID can be done as:
int idToupdate = Convert.ToInt32(Request.QueryString["id"].ToString());
ContactsDb db = new ContactsDb();
Contact con = db.Contacts.SingleOrDefault(p => p.id == idToupdate);
Once this code is executed, the Contact object will contain the required values.

Updating the record

If we want to update a record, then a simple update operation can be performed as:
int idToupdate = Convert.ToInt32(Request.QueryString["id"].ToString());
ContactsDb db = new ContactsDb();
Contact con = db.Contacts.SingleOrDefault(p =>  p.id == idToupdate);

con.phone = TextBox1.Text;
db.SaveChanges();
Once this code executes, the value of phone number will be updated by a new value which is retrieved from TextBox1.

Deleting a record

If we want to delete a particular record then we can perform a delete operation by using the DeleteObjectfunction. The following code snippet demonstrates the same:
//delete this contact
int idToupdate = Convert.ToInt32(Request.QueryString["id"].ToString());
ContactsDb db = new ContactsDb();
Contact con = db.Contacts.SingleOrDefault(p => p.id == idToupdate);

db.Contacts.DeleteObject(con);
db.SaveChanges();
Now that we have the basic CRUD operations performed on the database using the Entity Framework.

A note on Relationships and Lazy Loading

To understand the Entity Framework we need to understand some things like naming conventions, relationships between tables, and relationships between entities. Also, the concept of lazy loading once fully understood will give the power to the developer to use the Entity Framework efficiently.
Note: Since this is an introductory article on Entity Framework we have not discussed these things. Perhaps we will discuss them in a separate article.

Points of interest

Entity Framework has been in use for some time now. But there are many developers who are still getting started with Entity Framework. This article was meant as an overview of the Entity Framework. This should not be treated as a complete tutorial. Also, the code written is very simple and there is a lot of scope for optimization but since the idea here is to understand Entity Framework, I tried to keep the code simple and readable rather and optimal.
Note: To run the solution, please change the database path of ConnectionString in the web.config file.

how to check the version of oracle database in sql developer :

https://docs.oracle.com/cd/E17781_01/server.112/e18804/dbconfig.htm#ADMQS253

You can use SQL Developer to view the database version information and national language support (globalization) settings.
This section contains the following topics:

Viewing Database Version Information

To view database version information:
  1. In SQL Developer, click the Reports tab on the left, near the Connections navigator. (If this tab is not visible, click View, then Reports.)
  2. In the Reports navigator, expand Data Dictionary Reports.
  3. Under Data Dictionary Reports, expand About Your Database.
  4. Under About Your Database, click Version Banner.
    The Version Banner report is displayed, as shown in Figure 9-1.

    Viewing Database Globalization Information

    To view database globalization (national language support, or NLS) parameter information:
    1. In SQL Developer, click the Reports tab on the left, near the Connections navigator. (If this tab is not visible, click View, then Reports.)
    2. In the Reports navigator, expand Data Dictionary Reports.
    3. Under Data Dictionary Reports, expand About Your Database.
    4. Under About Your Database, click National Language Support Parameters.
      The National Language Support Parameters report is displayed, as shown in Figure 9-1.
      Figure 9-2 National Language Support Parameters Report

https://community.oracle.com/thread/2250946

http://stackoverflow.com/questions/101184/how-can-i-confirm-a-database-is-oracle-what-version-it-is-using-sql

You can try:
SELECT * FROM V$VERSION
select * from v$version;
Result:
Oracle Database 10g Enterprise Edition Release 10.2.0.2.0 - Prod
PL/SQL Release 10.2.0.2.0 - Production
"CORE 10.2.0.2.0 Production"
TNS for Linux: Version 10.2.0.2.0 - Production
NLSRTL Version 10.2.0.2.0 - Production
or

Getting the current Oracle version (via a SQL Select query):

select *
from v$version;

select *
from product_component_version;
Result:
Product                                 Version         Status
NLSRTL                                  10.2.0.2.0 Production
Oracle Database 10g Enterprise Edition  10.2.0.2.0 Prod
PL/SQL                                  10.2.0.2.0 Production
TNS for Linux:                          10.2.0.2.0 Production
or
BEGIN DBMS_OUTPUT.PUT_LINE(DBMS_DB_VERSION.VERSION || '.' || DBMS_DB_VERSION.RELEASE); END;
======
select from v$version;*

This will give you detailed version number of the database components. You can also use 

select from PRODUCT_COMPONENT_VERSION;*

to get various components of the DB with their version.